
False lashes have been around for decades, but only in recent years have they become a “must have” for millennials to be using both for special occasions and for everyday use. With more women opting in to use false lashes to amplify their look or as a mascara alternative, many different variations of false lashes have launched on the market, the most unique being “magnetic lashes“. I for one have been using false lashes since my late high school years, specifically for special occasions and evenings out. When I saw the launch of magnetic lashes, I couldn’t help myself from trying them out as they “seemed” to be a less messy alternative to your standard lash strip. On that note, today I’ll be sharing my personal experience and review of the Ardell Magnetic Lashes in 110 double!
Ardell Magnetic Lashes Review

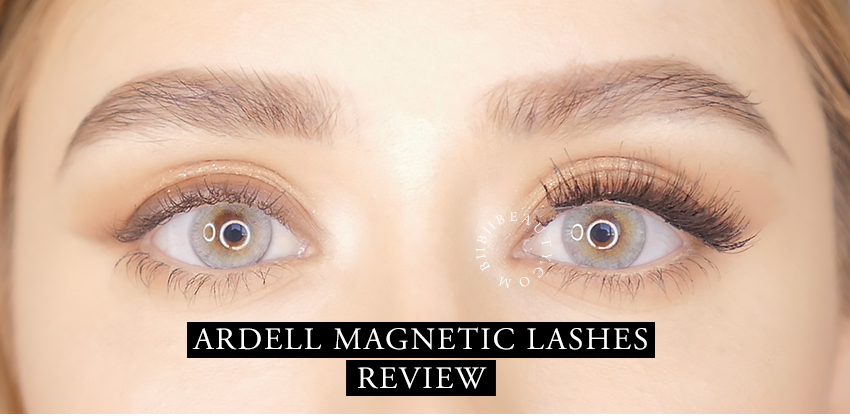
The Ardell magnetic lashes launched in early 2018 in the US and later in Canada. The collection includes only 3 styles of lashes such as, Volume, Double, and Demi which on average cost around $23 CAD which is a big price increase compared to your standard Ardell lash strips. As I felt the Volume style would be too dramatic of a look for myself, I opted for the Double as it seemed to provide a believable volume to the lashes, without looking over the top on eyes.

The Ardell magnetic lashes come in 2 parts, a top and a bottom. These two parts are supposed to be applied in a “sandwich” method where you clasp the Ardell magnetic lashes to your natural lashes, enclosing them while the magnetic lashes hold to your real lashes. Seem’s simple enough!
Application
Upon removing the lashes from their casing, it’s clear to see that both the top and bottom strips have 3 magnetics each, one in the middle and one on each end of the strips. After removing the Ardell magnetic lashes from their package, I used false eyelash application tweezers from Velour Lashes to place my Ardell Magnetic Lashes to the top lash line. The directions state to start by applying the top lashes first, before attaching the bottom lash strip. At first, it seemed a little difficult to properly place the magnetic lashes as the top lash strip had nothing to grip to unlike how regular false lashes use glue to grip to the lash line, the Ardell magnetic lashes have nothing at first. It’s almost as if you’re trying to place a down feather onto your lashes. It was easy enough getting the centre of the lash strip in place, but it was difficult getting the inner and outer corners at first. Once the top strip was in place, I proceeded to attach the bottom lash strip which is where things got very difficult.

The bottom strip of the Ardell magnetic lashes was very tricky to perfectly attach. At first, it was a bit nerve-racking as you’re putting something prickly very close to your eye, unlike regular false eyelashes that only go near the lid, the bottom strip gets a little uncomfortably close. But you quickly get over that feeling. It was tricky at first as the magnets suddenly attach when you don’t want them to and can attach unevenly. For myself, I found it most difficult getting the lashes to attach snugly to the lash line without gaps. The middle attachment was the easiest, but the outer corners, specifically the inner corner proved to be the most difficult. It took me around 7 minutes to get one eye done. The left eye is more difficult than the right.
My Tips

I have worn the Ardell magnetic lashes quite a bit since my first time using them in the above video, and I have found with practice that the best way to apply these magnetic lashes for the best look is to apply they on lashes that already have a coat of mascara on as this gives the Ardell magnetic lashes something “grip” to so they don’t slide around during the attachment process where they tend to slide, making the magnets attache farther from the lash line then desired. My next tip is so “pre-curl” the magnetic lashes by clasping them together prior to application and curling them with a lash curler. I found this makes the lashes look much more believable. I recommend doing it prior to attachment because most eyelash curlers are metal and the magnets will attach to the curler and be removed from your own lashes if you try to curl them while they are being worn. If you have a plastic eyelash curler, then you can curl them while you’re wearing the magnetic lashes!
My opinion
Personally, I like these a lot more than standard lashes with glue as I feel they are less likely to mess up your makeup, especially if they accidentally come loose which mine never have! Plus they are more reusable as they never get dirty with mascara or glue. At first, they are difficult to apply, but you quickly find a technique that works best for yourself making application fast and simple. I just wish they would come out with more styles!

[wp-review id=”4063″]
Where to Buy?
You can get Ardell Magnetic Lashes are beauty supply stores, drugstores or conveniently online on Amazon by clicking here.
PIN IT


No Comments